Table of Contents
ToggleHow to Help a Choking Infant
Introduction
Few things terrify parents more than seeing their baby struggle to breathe. Choking in infants is a life-threatening emergency that requires immediate action. Babies explore the world with their mouths, and their tiny airways can easily become blocked. Whether it’s a piece of food, a small toy, or even liquid going down the wrong way, knowing how to respond quickly and correctly can save a baby’s life. Unfortunately, many parents and caregivers panic in the moment or don’t know the right steps to take, which can make the situation worse.
Understanding infant first aid isn’t just useful—it’s essential. Unlike adults, infants cannot cough forcefully or communicate distress clearly. This makes choking incidents particularly dangerous for them. By learning what choking looks like, how to respond, and what to avoid, you can be prepared to act confidently if your baby—or any infant in your care—ever faces this emergency.
This guide will walk you through everything you need to know: from identifying the signs of choking, to performing life-saving techniques like back blows and chest thrusts, to preventing choking risks before they happen. It’s knowledge every caregiver should have, and it could make the difference between life and death.
Understanding Infant Choking
To help a choking infant effectively, you first need to understand what’s happening inside their airway. Choking occurs when something obstructs the trachea (windpipe), preventing oxygen from reaching the lungs. For infants, even tiny objects can cause complete blockage because their airways are so narrow.
There are two main types of airway obstruction:
-
Partial obstruction – Air can still pass through, but the baby may cough, gag, or wheeze. In this case, you should encourage the baby’s natural cough reflex rather than intervene immediately.
-
Complete obstruction – No air is getting through, and the baby cannot cry, cough, or breathe. This is a medical emergency requiring immediate action.
Infants are especially vulnerable because:
-
Their chewing skills are not fully developed.
-
They lack molars to grind food into safe sizes.
-
They often explore objects by putting them into their mouths.
-
Their gag reflex is not always strong enough to protect them.
Recognizing the difference between partial and complete choking is critical. Acting too soon during partial choking may worsen the situation, while failing to act quickly in complete choking could be fatal.
Common Causes of Choking in Infants
Choking in babies can happen in the blink of an eye, and knowing the most common culprits helps you reduce risks at home.
1. Food-related choking hazards
-
Grapes, cherries, and cherry tomatoes (especially whole)
-
Hard foods like raw carrots or apples
-
Sticky foods like peanut butter
-
Small, round foods such as popcorn, nuts, and hard candies
2. Non-food choking hazards
-
Small toys, marbles, and building blocks
-
Loose buttons, coins, or batteries
-
Pieces of broken crayons or erasers
-
Jewelry or household items left within reach
3. Developmental factors
Infants between 6–12 months are at the highest risk because this is when they start eating solids and crawling. Their curiosity drives them to grab and mouth objects, while their fine motor skills are not yet developed enough to handle food safely.
By being mindful of these risks, you can significantly lower the chances of choking incidents. However, no environment is 100% safe, which is why knowing what to do in an emergency is just as important as prevention.
Recognizing the Signs of Choking in an Infant
Spotting the difference between mild and severe choking is essential. The faster you identify what’s happening, the faster you can help.
Mild (partial) choking symptoms:
-
Coughing forcefully
-
Gagging or sputtering
-
Making some noise while trying to breathe
-
Face turning slightly red
Severe (complete) choking symptoms:
-
Inability to cry, cough, or make sounds
-
Face turning blue or pale
-
Struggling silently with wide eyes and panic
-
Weak or no airflow from the mouth or nose
If the baby is coughing effectively, do not interfere—encourage them to keep coughing while keeping a close eye. If the baby is silent and struggling, you must act immediately.
What to Do Immediately if a Baby is Choking
The first seconds matter most in a choking incident. Your priority is to stay calm, act quickly, and follow a structured process.
-
Assess the situation – Is the baby breathing or coughing? If yes, let them try to clear it themselves. If not, intervene.
-
Call for help – Shout for someone nearby to dial emergency services. If you are alone, perform life-saving steps first before calling.
-
Check responsiveness – If the baby is unresponsive or turning blue, begin emergency measures immediately.
-
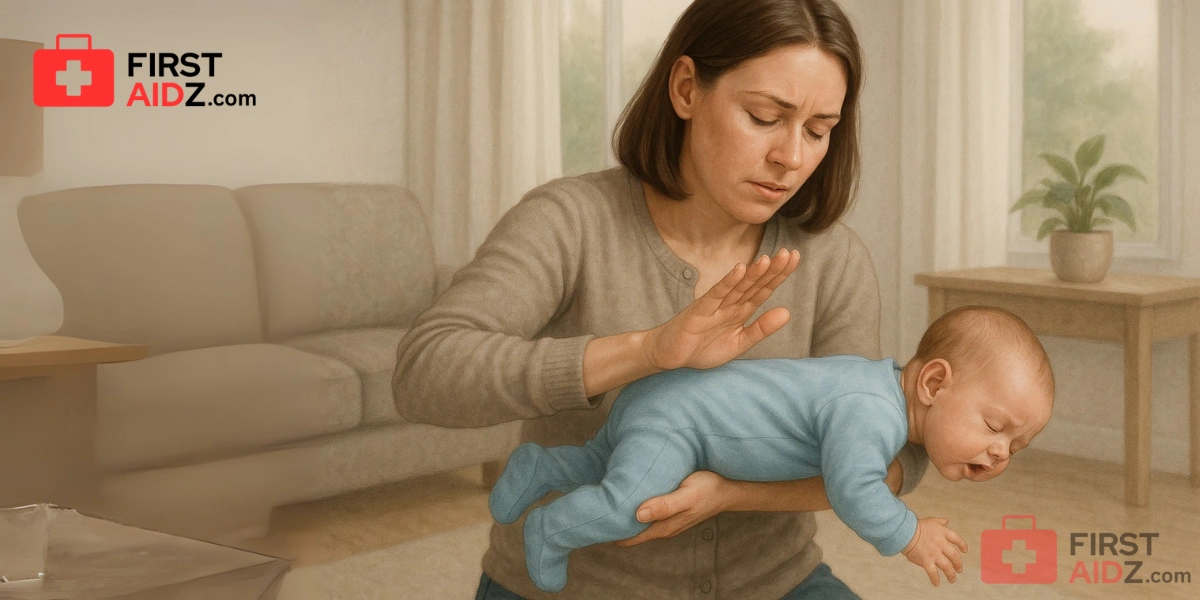
Position the infant – Place the baby face down across your forearm, supporting their head and neck.
-
Perform back blows and chest thrusts – Use alternating techniques until the obstruction clears or help arrives.
Remaining calm is easier said than done, but panic can cloud judgment. Taking a few deep breaths and remembering the correct steps can help you stay focused in a high-pressure moment.
Step-by-Step Guide to Helping a Choking Infant
When a baby is choking, knowing the correct sequence of actions can save their life. It’s not enough to know what choking looks like—you must also be confident in how to respond. The two most effective techniques for infants under 1 year old are back blows and chest thrusts. These are recommended by medical authorities like the American Heart Association and Red Cross.
Here’s the order of steps:
-
Place the baby face down across your forearm.
-
Support the head and neck securely, keeping the head lower than the chest.
-
Deliver up to 5 back blows between the shoulder blades.
-
If the object doesn’t come out, turn the baby onto their back.
-
Perform up to 5 chest thrusts using two fingers in the center of the chest.
-
Repeat the sequence until the airway clears or emergency help arrives.
The key is repetition—alternate between back blows and chest thrusts until you’re successful. It may feel frightening, but these actions are designed to force air out of the lungs to expel the obstruction.
Performing Back Blows
Back blows are often the first step in helping a choking infant. Done correctly, they create vibrations and pressure in the airway that can dislodge whatever is stuck.
How to do it correctly:
-
Sit down and rest your arm on your thigh for support.
-
Place the baby face down across your forearm, holding their jaw and head firmly.
-
Ensure the baby’s head is lower than their chest to allow gravity to help.
-
Use the heel of your free hand to deliver five firm back blows between the baby’s shoulder blades.
-
Check after each blow to see if the object has been expelled.
Important tips:
-
Don’t strike too gently—weak blows may not help. But also don’t use uncontrolled force. Aim for firm, quick movements.
-
Make sure the baby’s head and neck are supported at all times.
-
Avoid using your fingertips; only the heel of your hand should deliver the blows.
Many caregivers hesitate, fearing they’ll hurt the baby. But remember, the risk of not acting is far greater. Properly performed back blows are safe and highly effective in clearing an airway.
Performing Chest Thrusts
If back blows don’t work, chest thrusts are the next step. These are similar to CPR compressions but more focused and controlled.
How to perform chest thrusts:
-
After completing five back blows, turn the baby onto their back.
-
Place two fingers (usually the index and middle fingers) in the center of the chest, just below the nipple line.
-
Deliver five quick thrusts, pressing down about 1.5 inches deep.
-
Check if the object has been expelled after each thrust.
-
If not, turn the baby over again and repeat with back blows.
Key things to remember:
-
Keep your thrusts firm but controlled—you don’t want to cause injury, but you need enough force to push air out of the lungs.
-
Always alternate between five back blows and five chest thrusts.
-
Continue until the obstruction is cleared or emergency help arrives.
Chest thrusts are especially helpful when the object is lodged tightly and back blows alone aren’t effective. By combining the two methods, you increase the chances of success.
What NOT to Do When an Infant is Choking
In a moment of panic, people often try dangerous or ineffective methods. Knowing what not to do is just as important as knowing what to do.
1. Do not perform the Heimlich maneuver (abdominal thrusts) on infants under 1 year old.
This method is safe for older children and adults but can cause serious harm to a baby’s internal organs. Stick with back blows and chest thrusts only.
2. Do not put your fingers blindly in the baby’s mouth.
Many caregivers instinctively try to “sweep” the mouth with a finger. This can push the object further down and worsen the blockage. Only remove an object if you can clearly see and grasp it.
3. Do not shake the baby.
Shaking is dangerous and can cause brain injury. It does not help dislodge choking objects.
4. Do not waste time trying unproven methods.
Some myths—like hanging the baby upside down or patting their feet—are ineffective and unsafe. Trust the proven first aid techniques.
When dealing with a choking infant, every second counts. Stick to safe, recommended methods and avoid risky improvisations.
After the Choking Incident
Even if your baby seems fine after choking, you should always follow up with medical evaluation. Here’s why:
-
Hidden damage – The object may have scratched or irritated the throat or airway.
-
Remaining obstruction – Tiny pieces of food or debris can still cause problems later.
-
Silent complications – Difficulty breathing, wheezing, or coughing may develop hours afterward.
What to do next:
-
Call your pediatrician or visit urgent care to have the baby checked.
-
Watch closely for any signs of breathing difficulty or unusual behavior.
-
Offer comfort—babies may be shaken or scared after choking.
Caregivers also need time to recover emotionally. Choking scares are traumatic, and it’s normal to feel shaken even if everything turned out fine. Talking about the experience and reviewing first aid techniques can help you feel more prepared for the future.
Preventing Choking in Infants
The best way to handle choking is to prevent it from happening in the first place. While you can’t remove every single risk, you can make your baby’s environment much safer with a few proactive steps.
Safe feeding practices:
-
Always supervise babies while they’re eating—never leave them alone with food.
-
Sit your baby upright in a highchair during mealtimes; lying down increases the chance of choking.
-
Introduce age-appropriate foods. Avoid hard, round, or sticky foods until your child is developmentally ready.
-
Cut food into small, manageable pieces. For example, grapes should be cut into quarters, and hot dogs should be sliced lengthwise and then into small pieces.
-
Encourage slow eating. Babies should take their time rather than stuffing too much in at once.
Baby-proofing your home:
-
Get down on your hands and knees to see your home from your baby’s perspective. This helps you spot small objects they might reach.
-
Store coins, batteries, buttons, and other small items well out of reach.
-
Regularly check toys for loose parts that could break off.
-
Keep older siblings’ toys (like Legos or marbles) in a separate area away from the baby.
Toy and product safety:
-
Choose toys labeled for the correct age group.
-
Avoid toys with small detachable parts.
-
Inspect pacifiers and teething toys often for cracks or wear.
By taking these precautions, you significantly reduce the risk of choking incidents. Prevention is all about awareness and creating a safe environment that supports healthy exploration.
Foods That Pose a High Choking Risk
When introducing solid foods, parents often wonder which foods are most dangerous for choking. Knowing the risky foods helps you avoid unnecessary emergencies.
High-risk foods include:
-
Whole grapes or cherry tomatoes
-
Hot dog slices (especially cut into round coins)
-
Popcorn
-
Nuts and seeds
-
Hard candies or chewing gum
-
Raw carrots, apples, or celery sticks
-
Marshmallows (they’re soft but sticky and difficult to swallow safely)
Safer alternatives:
-
Cut grapes and tomatoes into quarters.
-
Slice hot dogs lengthwise and then into tiny pieces.
-
Cook vegetables until they’re soft enough to mash easily.
-
Offer small pieces of banana, avocado, or well-cooked pasta.
-
Spread peanut butter thinly on bread instead of offering spoonfuls.
Food preparation tips:
-
Always test food texture before offering it to your baby. If you can mash it easily with your tongue against the roof of your mouth, it’s likely safe.
-
Introduce one new food at a time to monitor your baby’s chewing and swallowing ability.
-
Stay close by while your baby eats—supervision is the best safety net.
These food adjustments may seem small, but they make a big difference in reducing choking risks while still allowing your baby to explore new tastes and textures.
Teaching Caregivers and Family Members
Even if you know what to do when a baby is choking, you might not always be around. That’s why it’s crucial that everyone who cares for your baby—grandparents, babysitters, siblings, daycare staff—knows infant choking first aid.
Why this matters:
-
Emergencies can happen anytime, and anyone watching the baby should be prepared.
-
A quick response increases the chances of saving the baby’s life.
-
Consistency among caregivers prevents confusion during stressful situations.
How to prepare caregivers:
-
Enroll family members in an infant CPR and choking first aid course. Many organizations offer short, practical classes.
-
Share simple step-by-step instructions and keep a printed guide in your home.
-
Practice with infant CPR mannequins if possible—hands-on learning builds confidence.
-
Encourage older siblings (around age 8 and up) to learn basic choking response steps too.
Resources available:
-
The American Red Cross and American Heart Association offer certified courses.
-
Online tutorials and community workshops are widely available.
-
Pediatrician’s offices often provide safety handouts and demonstrations.
Knowledge is power. The more people in your baby’s circle who are trained, the safer your baby will be, no matter where they are or who they’re with.
Emergency Situations Beyond Choking
Sometimes choking escalates into more serious emergencies. If the obstruction isn’t cleared quickly, the baby may lose consciousness. In this case, your response changes from choking first aid to CPR.
When the baby becomes unresponsive:
-
Call emergency services immediately if you haven’t already.
-
Lay the baby flat on their back on a firm surface.
-
Begin infant CPR:
-
Give 30 gentle chest compressions using two fingers at the center of the chest.
-
Follow with 2 rescue breaths, covering both the baby’s nose and mouth with your mouth.
-
Continue cycles of 30 compressions and 2 breaths until help arrives or the baby starts breathing.
-
Other airway emergencies to watch for:
-
Allergic reactions causing swelling (anaphylaxis).
-
Breathing difficulties related to infections like croup or bronchiolitis.
-
Aspiration, when food or liquid goes into the lungs instead of the stomach.
Not every breathing emergency is choking, but the skills you learn overlap and prepare you for multiple scenarios. The key is quick recognition and decisive action.
Final Tips for Parents and Caregivers
Dealing with a choking incident is one of the most frightening moments any parent or caregiver can face. While prevention and preparation are the best defenses, having a clear action plan is just as important. Here are some final tips that can help you feel ready and confident:
-
Stay calm and focused. Your baby senses your stress. The calmer you remain, the more effectively you’ll respond. Take a deep breath and focus on the steps you’ve practiced.
-
Always keep emergency numbers handy. Save them in your phone and post them visibly in your home for babysitters or family members.
-
Take a certified infant CPR and first aid class. Knowledge builds confidence. Practicing with professionals ensures you’ll act quickly and correctly in an emergency.
-
Supervision is your best prevention. Babies move fast and can grab small objects in an instant. Being present during meals and playtime reduces risks.
-
Create a choking prevention checklist. Review it with everyone who cares for your baby—safe foods, safe toys, safe feeding positions, and quick access to first aid knowledge.
Parenting is full of challenges, and while you can’t control everything, you can control how prepared you are. Remember, choking is a common emergency, but it’s also one that parents and caregivers can successfully manage with the right knowledge and confidence.
Conclusion
Choking in infants is a frightening emergency, but it doesn’t have to end in tragedy. By understanding the risks, recognizing the signs, and learning the correct first aid techniques, you can act swiftly and effectively when every second counts. Back blows and chest thrusts are safe, proven methods for babies under one year old, and knowing how to alternate between them could save a life.
Prevention is equally important. Safe feeding practices, careful supervision, and baby-proofing your home all go a long way toward reducing the chances of choking. And since emergencies can happen anytime, ensuring that all caregivers know what to do is just as vital as learning the steps yourself.
At the end of the day, being prepared is about more than just safety—it’s about peace of mind. You can’t stop your baby from exploring the world, but you can make that world a safer place. And with the right knowledge, you’ll be ready to protect your little one in those critical moments.
FAQs
1. Can I perform the Heimlich maneuver on a baby?
No. The Heimlich maneuver (abdominal thrusts) should never be used on infants under one year old. Their bodies are too small and fragile. Instead, use back blows and chest thrusts, which are safe and effective.
2. How do I know when to call 911 for choking?
Call immediately if your baby is silent, unable to breathe, turning blue, or becomes unresponsive. If you’re alone, perform first aid for about two minutes before calling, unless you can use a speakerphone while helping.
3. What should I do if my baby becomes unconscious?
Lay the baby flat on their back and begin infant CPR—30 chest compressions followed by 2 rescue breaths. Continue until emergency responders arrive or your baby starts breathing again.
4. Can teething toys cause choking?
Yes, if they are damaged or have small detachable parts. Always check teething toys regularly for cracks, tears, or loose pieces, and replace them at the first sign of wear.
5. How can I practice first aid skills before an emergency happens?
The best way is to take a certified infant CPR and first aid class. Many organizations also provide practice mannequins and simulations to help you build confidence before a real emergency.
Disclaimer: This article is for informational purposes only and not a substitute for professional medical advice. Always consult a healthcare provider or seek emergency help in case of choking.
1 thought on “How to Help a Choking Infant”
Comments are closed.